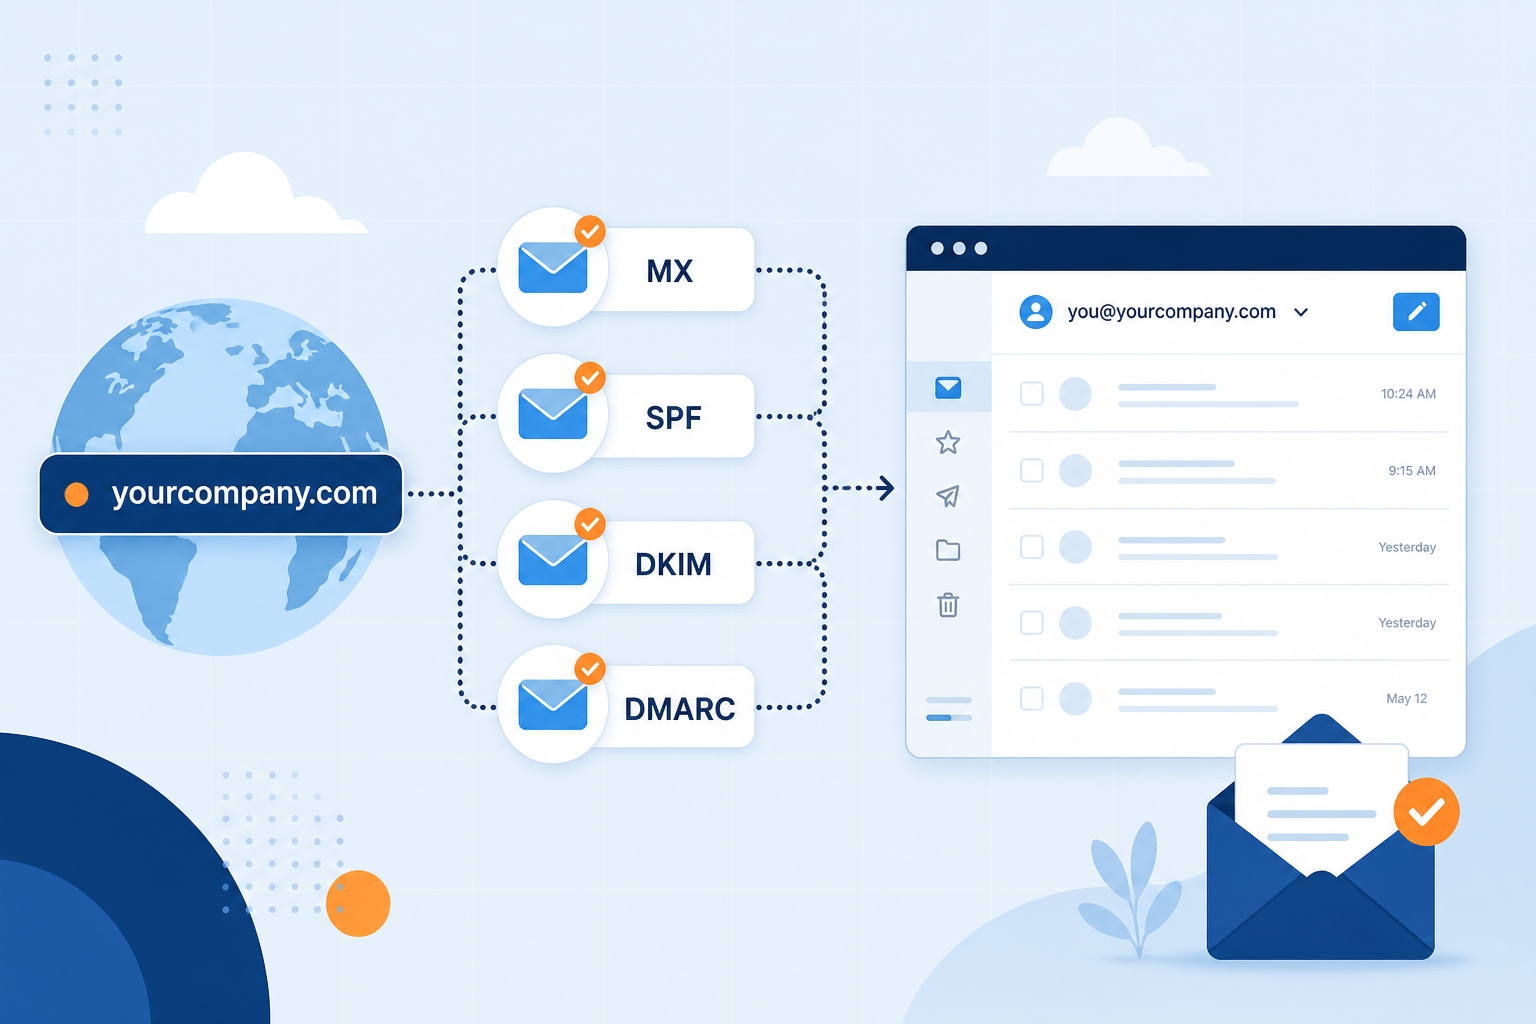
If your customers still email you at a free @gmail.com or @yahoo.com address, you are leaving trust on the table. A professional address like you@yourcompany.com signals that you run a real business — and it gives your team a clean place to send, receive, and share work mail.
This guide shows you how to set up business email on a domain you own using MailShrine Business Email: add the domain, publish the DNS records we show you, create mailboxes, add aliases like hello@, then open webmail and send a test. You do not need Google Workspace, Microsoft 365, or a full productivity suite just to get professional mail.
Real-life example: Bloom & Bake
Adaobi runs Bloom & Bake, a small bakery in Lagos. She bought the domain bloomandbake.ng for her website, but orders still arrive at bloomandbakeorders@gmail.com. Clients sometimes ask if the shop is legitimate. Her cousin keeps missing inquiries because they share that one Gmail login.
Adaobi’s goal for one Saturday afternoon:
- Use
adaobi@bloomandbake.ngfor her own inbox. - Use
hello@bloomandbake.ngso staff can reply to customer questions without sharing her password. - Keep the website on its current host — only email DNS changes.
We will follow Adaobi’s path below. Swap her domain for yours.
What you need before you start
| Item | Why you need it |
|---|---|
| A domain you control | e.g. bloomandbake.ng or acme.com — bought at Namecheap, Cloudflare, GoDaddy, etc. |
| Login access to DNS | Ability to add MX and TXT records at that registrar (or wherever DNS is pointed). |
| A MailShrine account | Same login as MailShrine Email Marketing — then open Business Email. |
| About 20–40 minutes | Plus waiting time while DNS propagates (often under an hour, sometimes up to 24–48 hours). |
Important: Your website host and your email host can be different. Changing MX / email TXT records does not move your website — as long as you leave A / CNAME records for the site alone.
Step 1: Open MailShrine Business Email
- Sign in at MailShrine (or create an account).
- Open Business Email from products / the suite switcher.
- Land on the dashboard Overview. From here you will use Domains, then Mailboxes.
Pick a plan that matches how many mailboxes you need (Free is fine for one mailbox while you learn; Solo / Team / Business unlock more seats and storage). You can upgrade later without redoing DNS.
Step 2: Add your domain
- Go to Domains.
- Enter your domain exactly as customers type it — for Adaobi:
bloomandbake.ng(nohttps://, no trailing slash). - Continue. MailShrine creates the domain in your workspace and shows the exact DNS records to publish.
You should see status like Pending until MX / authentication records verify. That is normal.
Step 3: Publish MX, SPF, DKIM, and DMARC
MailShrine shows you the records for your host. Copy them into your DNS panel. Here is what each one does in plain language:
MX — “Where should inbound mail go?”
MX records tell the internet which mail server receives email for @yourdomain. Without correct MX, people cannot deliver mail to your new addresses.
Typical pattern (values are examples — always paste what MailShrine displays):
| Type | Host | Priority | Value |
|---|---|---|---|
| MX | @ | 10 | mail.example-host.tld |
SPF — “Who is allowed to send as us?”
SPF is a TXT record that lists authorized sending systems. It reduces spoofing and helps inbox providers trust your outbound mail.
Example shape:
- Host:
@ - Value:
v=spf1 include:… ~all
Critical: Publish only one SPF TXT record per domain. If you already have an SPF from your website host or an old email provider, merge includes into a single v=spf1 … line instead of adding a second record.DKIM — “Was this message really from us and unaltered?”
DKIM publishes a public key so receivers can verify signatures on outbound mail. MailShrine shows you the hostname (often a selector like mail._domainkey) and the value to paste.
DMARC — “What should receivers do if checks fail?”
DMARC sits at _dmarc and starts safely in monitoring mode:
- Host:
_dmarc - Example value:
v=DMARC1; p=none; rua=mailto:dmarc@yourdomain.com
Start with p=none for at least a week or two while you confirm real mail is passing. Tighten to quarantine or reject later.
Registrar tips
| Registrar | Watch-outs |
|---|---|
| Cloudflare | Keep mail-related records DNS only (grey cloud). Proxying mail breaks SMTP. |
| Namecheap | Use Advanced DNS. Host @ means the root domain. |
| GoDaddy | Remove old MX rows that point at a previous host before saving the new ones. |
After saving, return to MailShrine and start verification. You can leave the page; verification keeps checking as DNS propagates.
Step 4: Wait for verification (and fix common blockers)
DNS is not always instant.
| Symptom | Likely cause | What to do |
|---|---|---|
| Still Pending after hours | Wrong host name (www instead of @) | Re-copy Host / Name fields from MailShrine |
| MX fails | Old MX still present | Delete legacy MX from the previous email host |
| SPF fails | Two SPF TXT records | Combine into one |
| Site works, mail does not | Expected | Email uses MX/TXT; site uses A/CNAME — independent |
When the domain shows Verified (and mail-server setup is complete if shown), you are ready for mailboxes.
Step 5: Create your first mailbox
- Open Mailboxes.
- Choose the verified domain.
- Pick a local part: Adaobi chooses
adaobi→adaobi@bloomandbake.ng. - Set a strong password (or finish setup if the dashboard asks you to complete provisioning).
- Save.
You now have a real mailbox with the storage included on your plan (for example Free includes 2GB; higher plans include more per mailbox).
Step 6: Add role addresses with aliases
Adaobi does not need a second paid seat just so customers can write to hello@.
- Open the mailbox settings for
adaobi@bloomandbake.ng. - Add an alias:
helloonbloomandbake.ng. - Mail to
hello@bloomandbake.nglands in Adaobi’s mailbox (or a shared mailbox if you invite team access later).
| Address | Type | Good for |
|---|---|---|
adaobi@bloomandbake.ng | Mailbox | Personal work identity |
hello@bloomandbake.ng | Alias | Public contact form / Instagram bio |
orders@bloomandbake.ng | Alias or second mailbox | Busy order volume |
Free plans include a small alias allowance; Solo and above unlock unlimited aliases — check Billing / Overview meters for your workspace.
Step 7: Open webmail and send a test
- Open MailShrine webmail for the new address.
- Send a test message to your personal Gmail/Outlook.
- Reply from Gmail back to
adaobi@bloomandbake.ngand confirm it arrives. - Optional: send from
hello@…(or reply-as alias if enabled) so the public address looks right.
If outbound goes to spam on first send, wait for SPF/DKIM/DMARC to fully propagate and avoid marketing language in the first test (“BUY NOW!!!”). A plain “Testing my new business email” is enough.
Step 8: Connect phones and Outlook (optional)
Most founders live in webmail for week one. When you are ready:
- IMAP (incoming) and SMTP (outgoing) settings appear in mailbox / client help inside the product.
- Typical ports: IMAP 993 (SSL), SMTP 587 (STARTTLS) — confirm against the exact hosts MailShrine shows.
- On iPhone: Settings → Mail → Accounts → Add Account → Other → add IMAP.
- On Outlook: add the account with the same IMAP/SMTP values (or the guided client setup when available).
We cover deeper client walkthroughs in the Clients & Devices guide category.
Adaobi’s finished setup (checklist)
By the end of the afternoon Adaobi has:
- Domain
bloomandbake.ngverified in MailShrineCompleted - MX + SPF + DKIM + DMARC published at her registrarCompleted
- Mailbox
adaobi@bloomandbake.ngCompleted - Alias
hello@bloomandbake.ngCompleted - Successful send + receive test via webmailCompleted
- Outlook on the bakery iPad (scheduled for Monday)Not completed
Her website is unchanged. Only email routing moved.
Common mistakes to avoid
- Changing A records “just in case” — can take your website offline. Touch only the mail records MailShrine lists.
- Leaving old MX records — inbound mail may bounce between hosts.
- Two SPF records — creates SPF permerror; merge includes.
- Proxying MX on Cloudflare — use DNS-only.
- Creating mailboxes before the domain verifies — finish DNS first so provisioning and delivery are clean.
- Sharing one mailbox password with the whole team — use aliases + team access invites instead of password sharing.
How this differs from Google Workspace “email setup”
Google Workspace and Microsoft 365 are full suites (Docs, Drive, Meet / Office, Teams). They are excellent when you need that whole stack.
If you mainly need professional mailboxes on your domain, a focused host like MailShrine Business Email is usually faster and cheaper: connect the domain, publish the records we generate, create mailboxes and aliases, and open webmail.
For deliverability beyond mailbox mail — for example bulk marketing campaigns — use MailShrine Email Marketing with proper authentication on the sending side. That is a different job from day-to-day business inboxes.
Check your work
- Domain status Verified in MailShrine Domains.
- Mailbox listed as active / provisioned.
- External round-trip: send to Gmail and reply back.
- Optional: look up your domain with an MX / SPF / DMARC checker (we are shipping free checkers under Business Email Tools).
Next steps
- Read How to Create a Custom Domain Email for address patterns and forwarding vs real mailboxes.
- See Email Alias vs Mailbox when you outgrow a single address.
- See IMAP & SMTP Settings when the team moves to Outlook or Apple Mail.
- Compare costs under How Much Does Business Email Cost if you are leaving Workspace seats behind.
Citations & References
- Reference: Google: Email sender guidelines
- Reference: ICANN: What is DNS?
- Reference: Cloudflare Learning Center: What is an MX record?
Written by Samira O., Business Email Setup Specialist. Samira helps founders and SMEs move from free Gmail inboxes to professional domain mail without buying a full Workspace suite.